
Seamless Node Shopping: Optimize Your Purchase of Smart and Lite Nodes
Our node shopping experience for purchasing Smart and Lite nodes was a project with several different phases. It allows the user to browse and shop before logging into the web application. Here they can view Smart and Lite nodes and start the process of making their purchase upon logging into the system. Throughout the process of researching and designing this responsive web application, I was able to meet and keep in mind the needs of our brands and their users.

Project Overview: Key Milestones and Deliverables
Design a front-end shopping experience that would allow brands to sell Smart and Lite Nodes, merchandise, and other digital products (NFTs, subscriptions, digital services, etc.) in a variety of currencies and payment options.
CHALLENGE
Design a front end shopping flow to purchase Smart and Lite nodes.
Allow a user to filter by different currency and payment options (ETH, USDC, Brand ERC-20, or Credit/Debit Card.
Provide a checkout experience that allows users to pay with their brand wallet, MetaMask, or an External Wallet.
Provide a checkout flow that allows a user to review their order, agree to their terms and conditions, submit their order, and confirm their order.
REQUIREMENTS
ROLE
UX/UI Designer
TIME
8 months
TOOLS
Figma
Unlocking Discoveries: Navigating the Realm of Research
Since I wasn’t very familiar with how a Node shopping checkout process worked, I had to do a fair amount of secondary research to gain a better understanding of how it worked. I reviewed traditional shopping cart flows as well as Web 3 to try and discover differences and similarities.
Through my research, I wanted to:
Understand how a node purchase from start to finish would work and what steps would be necessary to complete this task for a user.
Identify points of contact where a user adds items to their cart, checks out their cart, selects different currencies, selects different wallets, signs terms & conditions, and reviews their order before confirmation.
Learn about current trends that traditional retailers take to display product cards, filters, adding items to their cart, what is displayed on a checkout page, checkout flow, and more.
Discover the goals, needs, motivations, and frustrations of our brand’s users.
EMPATHIZE
I learned that there are two types of traditional shopping flow experiences, logging into an account to complete your purchase and checking out as a guest. Since this is Web3, the second option was not realistic so we decided to have our users log in to their app once they try and add an item to their cart. This behavior and method I’d seen utilized in retailers such as REI and Nike.
I immersed myself in the shopping experience and did secondary research for payment methods and checkout flows through Baymard and Nielsen Norman websites (free articles not premium).
I researched and studied Open Seas for inspiration on their product cards, filtering, grid, and list view layouts for responsive devices and more.
I researched Nike’s checkout flow and discovered how their navigation changed after initiating their checkout flow process. I also tried to mimic their cards and responsive filters for their web version.
I learned the importance of the checkout flow and how to tackle cart abandonment issues with the addition of our auto-check coupon code feature for purchasing a node with a referral credit. We used Amazon as inspiration for this addition to their flow and their psychology behind checking the box to help the user feel engaged and empowered when making their purchase.
I learned about different payment methods and wallets for checking out in our application. Currently, we offer a variety of currency options and wallet options a user can select from when checking out. To get to this point, I paired up with our product management team and designed several flows to accommodate different payment options and methods.
After conducting my market research I created a user persona. I really wanted to understand the type of user that would want to make a Web 3 purchase using our front-end shopping experience.
DISCOVERY

Crafting User Personas: Understanding Your Audience
To make sure that I truly understood a Web 3 user and that my process was as user-centered as possible, I wanted to have a clear understanding of who a typical user was that was interested in our front-end shopping experience. Through some initial discoveries, I found the following insights:
People want to make their purchase process as user-friendly and effortless as possible. Ideally one can make a purchase on a desktop as well as a mobile device.
People want the ability to understand the legalities around their purchase and have the option to review them before committing to making a major purchase like a Node.
People want to be able to purchase items using a variety of currencies and wallet options.
Defining the Problem: Identifying Core Challenges
Now with my understanding of our wallet user Issac, I wanted to start thinking about what problems we are trying to solve for him. I started to try and better understand them by creating a point-of-view diagram and a series of questions that would help drive my brainstorming process. On this diagram, I thought about what insights I could understand about the shopping flow process and its checkout experience, what the user’s immediate needs were during the process, what the user’s point of view would be like (and how could I empathize with it), and how might we help the user.

Setting Clear Project Goals: Achieving Success
After defining the problem, I generated a lot of ideas for these problems. At this point, I started to strategize and determine what goals I was trying to meet and what solutions would need to be prioritized.
First I started by defining the project goals to get a clear understanding of what we were trying to achieve and where the business and user’s goals aligned.
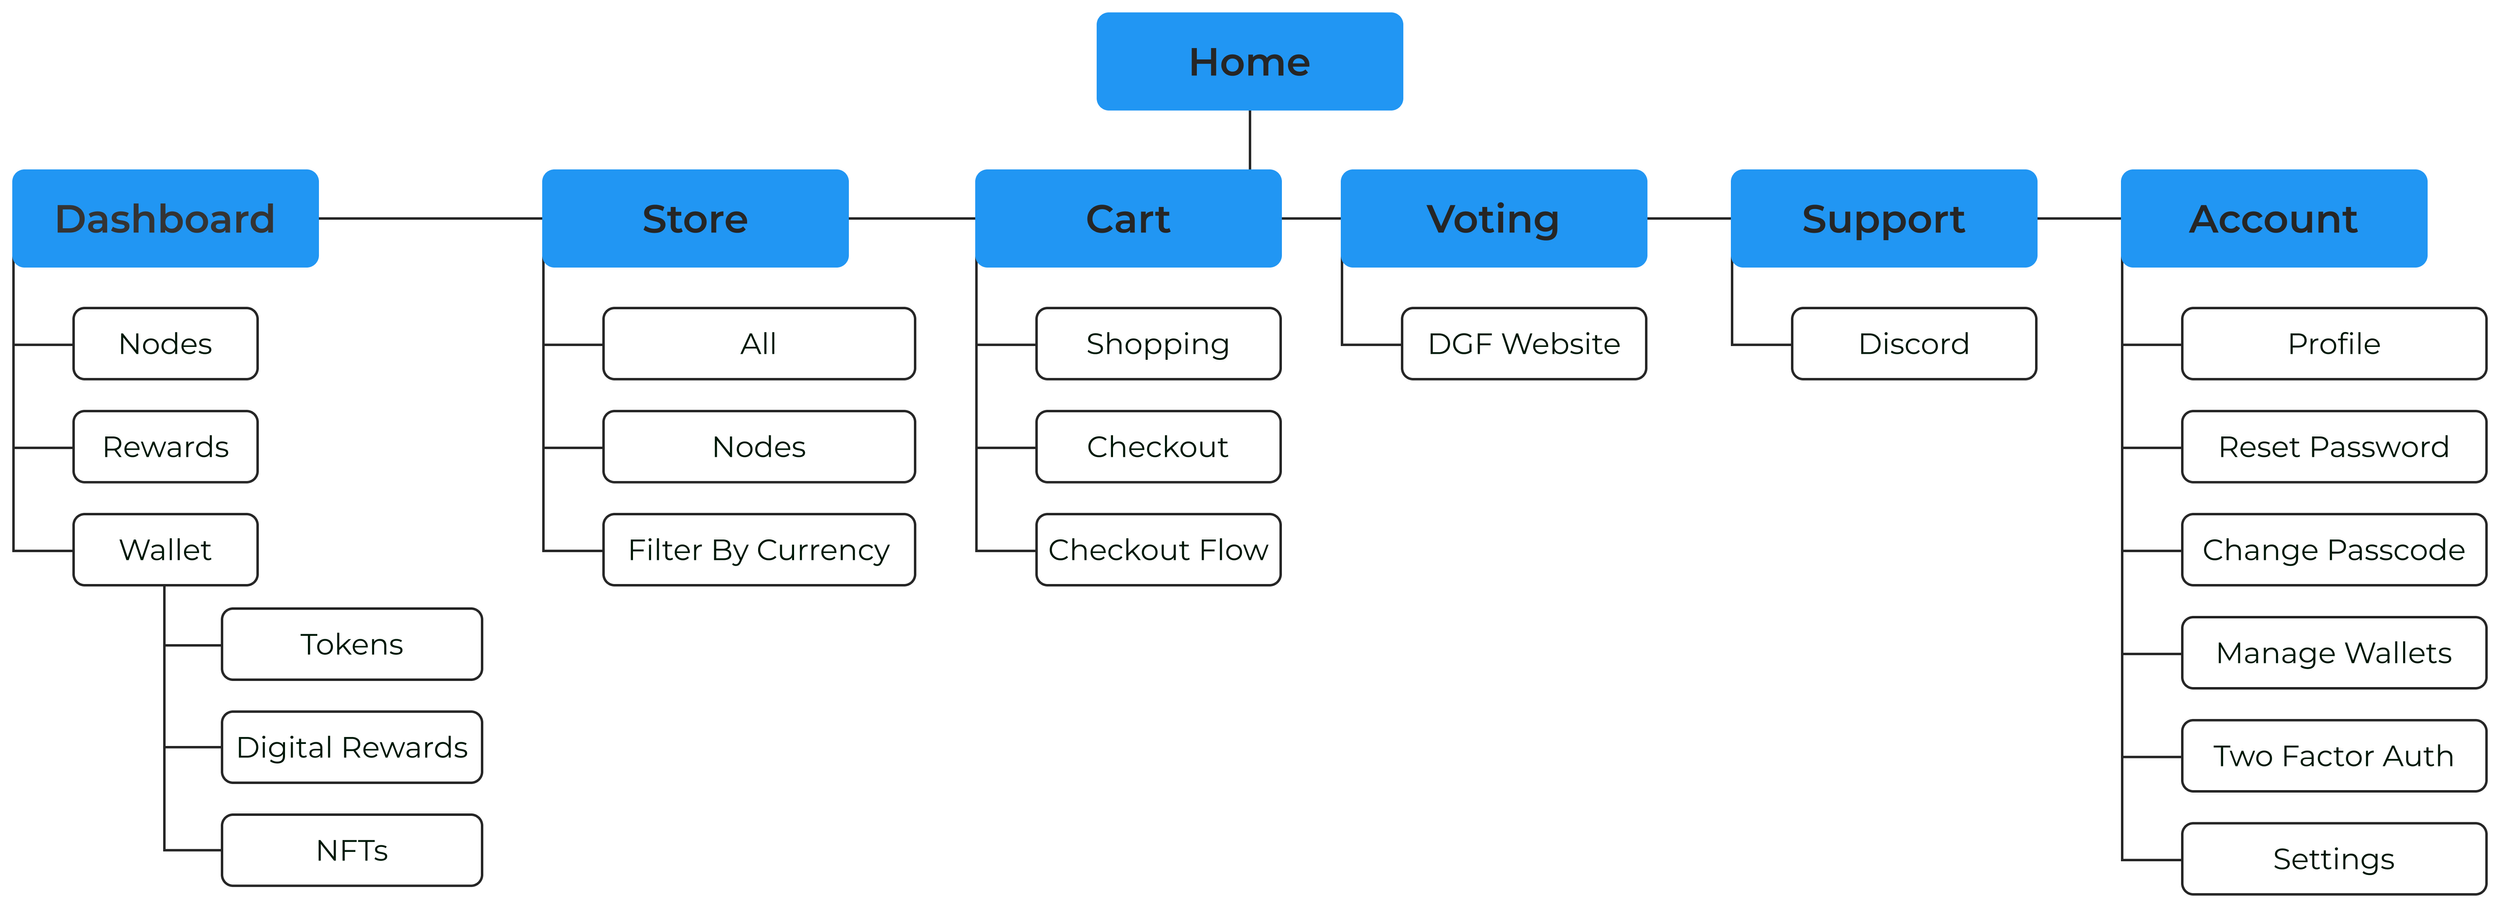
Creating an Effective Site Map: Structuring Your Web Application
To plan out the site architecture for this application and where the features would fit, I created an application site map (ongoing) to organize the screens in a way that would be logical and intuitive for our users. It’s broken down by main-level navigation and branches off into each page and sub-pages.

Designing User Flows: Enhancing the User Experience
To understand the overall journey that Brianna would be taking through the app from start to finish, I wanted to create different swim lanes that walked through different paths she could take. It was broken down into 7 different flows:

ADD PRODUCTS TO CART & CHECKOUT WITH ETH - A user would add a product to their cart and checkout with ETH.
This scenario involved adding a Smart or Lite node to their shopping cart, logging in to the system, going to their shopping cart, and checking out. Throughout the checkout process, they would have selected Ethereum (ETH) as their currency. Once they begin their checkout they would select the wallet of their choice (Brand, MetaMask, External). If they didn’t have their brand wallet set up, a user could select the setup button, go through the setup flow, and be redirected back to their shopping flow. Next, a user would review and sign their terms and conditions. This is an important step per our legal department as it informs the user of the agreements they need to review and sign. After this step, they would submit their order by reviewing it and entering their wallet passcode. Once their passcode was entered they would be taken to a processing order screen and then a confirmation order screen to complete their checkout process.

ADD PRODUCTS TO CART & CHECKOUT WITH USDC - A user would add a product to their cart and checkout with USDC.
This flow is identical to the one above, the main difference is the user would select the currency for USDC instead of Ethereum and use this and their wallet of choice to checkout.

ADD PRODUCTS TO CART & CHECKOUT WITH ERC-20 - A user would add a product to their cart and checkout with ERC-20.
This flow is identical to the one above, the main difference is the user would select the currency for Brand ERC-20 instead of Ethereum or USDC and use this and their wallet of choice to checkout. An ERC-20 token is a currency that can be used when a user converts their L2 rewards to L1 on the blockchain.

ADD PRODUCTS TO CART & CHECKOUT WITH CREDIT CARD - A user would add a product to their cart and checkout with a credit card.
This flow is identical to the one above, the main difference is the user would select the option for Credit / Debit Card upon checking out. From here they would review their terms and conditions, and then connect to Stripe Pay where they would enter their credit card information and process it. Once processed it would direct the user back to the processing order screen and then the order confirmation screen.

CHECKOUT SEQUENCE PAY WITH EXTERNAL WALLET ETH, USDC, ERC-20 - A user would checkout with an external wallet and pay with ETH, USDC, or ERC-20.
This scenario involves a user getting to their checkout process and selecting the external wallet option. It would redirect them to 3 separate flows based on the currency they had selected at the time (ETH, USDC, ERC-20). They would review their terms and conditions, then get to a screen where they could scan a QR code or copy a wallet address for their external wallet. Once they’d completed this step, they would select payment sent to process their order, be taken to a processing page and then the order confirmation screen.

CHECKOUT SEQUENCE PAY WITH METAMASK ETH, USDC, ERC-20 - A user would checkout with MetaMask and pay with ETH, USDC, or ERC-20.
This scenario involves a user getting to their checkout process and selecting the pay with MetaMask option. It would redirect them to 3 separate flows based on the currency they had selected at the time (ETH, USDC, ERC-20). They would connect and log in to their MetaMask account, review terms and conditions, and then confirm their order in MetaMask. Once confirmed they would be taken to a processing page and then the order confirmation screen.

FUND WALLET USING SWITCHPAY - A user would add (ETH) to the wallet using Switchpay during the checkout process.
This scenario involves a user getting to their checkout process and selecting the option within their wallet to add Ethereum (ETH). From here they would be given the option to add via an external wallet or using Switchpay. This is a flow that utilizes one of our brands Switch (https://switchrewardcard.com/), that allows a user to add more ETH to their wallet. You’d walk through the verification process, enter an amount to purchase, and enter your card and demographics information. Once you finalize the purchase, it will take you back to the original shopping checkout flow where you can continue with your purchase, review your terms and conditions, and process your order.
Wireframing Essentials: Building the Blueprint for Design
Using my understanding of the user, our goals, the site architecture, and the user flows, I worked on making informed decisions on designing the initial wireframes for this project. Working closely with our product management team, we came up with the main flows for existing and new users, and the homepage mockups.
Store Page All Products
Terms and Agreements Page
Pay With External Wallet Page
Store Product Details Page
Submit Order Page
Pay With MetaMask Confirm Page
Shopping Cart Page
Order Confirmation Page

Usability Testing: Ensuring User-Friendly Designs
For usability testing, I conducted a Maze test as well as reached out to participants on our research and user testing slack channel. The users were asked to share what they were doing, thinking, and feeling while interacting with the prototype and trying to complete the tasks given to them. I tested the 2 different flows: Add 5 Smart Nodes with USDC currency to your shopping cart, and complete the checkout process for your 5 Smart Nodes with your brand wallet.
Method: Maze testing, user participation from research, and user testing slack channel.
Participants: 15
Age Range: 28-50
Average Time: 3-5 minutes
Task 1 Add a smart node to their shopping cart - Completion Rate: 84%, 90% Direct Success 10% Indirect Success
✅ Users were able to add a node to their cart in less than 3 steps
Task 2 Checkout with their smart node and complete purchase - Completion Rate: 80%, 100% Direct Success
✅ Users were able to checkout and complete their purchase in less than 4 steps
Overall, the testing showed positive results and most users found the process easy to navigate and understand how to complete their task.
OVERVIEW
Select USDC Currency Filter Option Heatmap
Select Brand Smart Node Product Card Heatmap
Enter Quantity and Add to Cart Heatmap
Shopping Cart Begin Checkout Heatmap
Processing Your Order Heatmap
Enter Wallet Passcode Heatmap
Revisions and Updates: Refining Your Project
Taking what I learned from our phase I version of this project, I made some key updates as I progressed toward phase 3 on this feature. This project is ongoing and has 4+ phases.
PHASE 1 - Build out a basic end-to-end flow that captures a Node purchase with 1 currency and only using your brand wallet.
PHASE 2 - Update the entire flow with multiple currencies (ETH, USDC, ERC-20, Credit Card) and wallet options (Brand, External, MetaMask). Allow users to purchase a Smart Node with their credit card or add Ethereum to the wallet using Switchpay.
PHASE 3 - Update the rest of the shopping and subpages to MUI components and styles. Add in the coupon code for referrals to the checkout process.
Shopping Cart Phase 3 - This screen was updated with MUI components and styling. A promotion code for our referrals offer was added to the shopping cart page.
Shopping Cart Phase 3 - This screen was updated with MUI components and styling. A promotion code for our referrals offer was added to the submit order page.
Shopping Cart Phase 3 - This screen was updated with MUI components and styling. A promotion code for our referrals offer was added to the order summary page.
Shopping Cart Phase 3 - This screen was updated with MUI components and styling. A promotion code for our referrals offer was added to the order confirmation page.

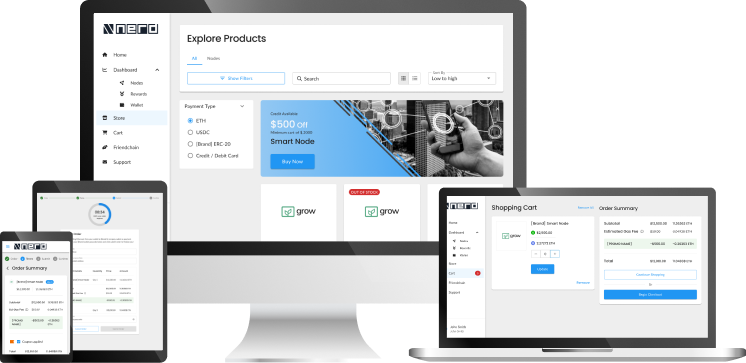
Final Prototype: Ready for Launch
Taking my revised mockups, I worked on creating a final high-fidelity mockup and prototype. With this phase clearly defined, I worked on incorporating new feature set ideas as well as anticipating future iterations. Since there are multiple flows in different phases, I’m going to include several links for reference below as well as a video.
Reflections & Next Steps: Learning from Experience
As someone who wasn’t very familiar with an end-to-end Web 3 shopping experience, I had to learn a lot through research to gain a better understanding of the intricacies and possibilities. Working closely with our product management team, I was able to discover our core strategy and solutions to our shopping experience problem. This was key in speeding up my workflow and understanding for phase III and beyond.
Overall this project was a lot of fun to work on and is still ongoing. Building a responsive web app for an end-to-end shopping experience seemed challenging at first but as I worked through the problems and discovered solutions, I was able to come up with designs that met both our user’s and stakeholder’s needs. I look forward to continuing on this project to see how it evolves in the future.
✅ Over 80% projected adoption for organic traffic landing on the shopping page
✅ Over 70% projected success rate for new shoppers being able to use whatever wallet and currency they chose
✅ 100% of users find the process streamlined and easy to use based off of initial feedback